 |
| Carefully wrapped and ready to travel |
Finally I have managed to complete the cleaning and restoration of the 17th or 18th century Penitent Magdalen painting on canvas which I brought from Italy last summer, putting into practice the techniques I learnt at the restoration workshop in Florence with Chiara Mignani.
 |
| Before |
 |
| After |
It has taken so long because I wanted to proceed with great caution so as not to damage the paint surface and to ensure that every stage of the cleaning was done with the correct tools and materials, carefully testing each procedure first and only going ahead after evaluating these experiments and considering the best way forward.
The paint surface whilst being a very dark tobacco orange brown with accumulated surface dirt and yellowed varnish was in fact very stable with only tiny paint losses and in very good condition. In one or two areas of the face there seemed to be some slight superficial retouching of highlights to the cheek and chin.
  |
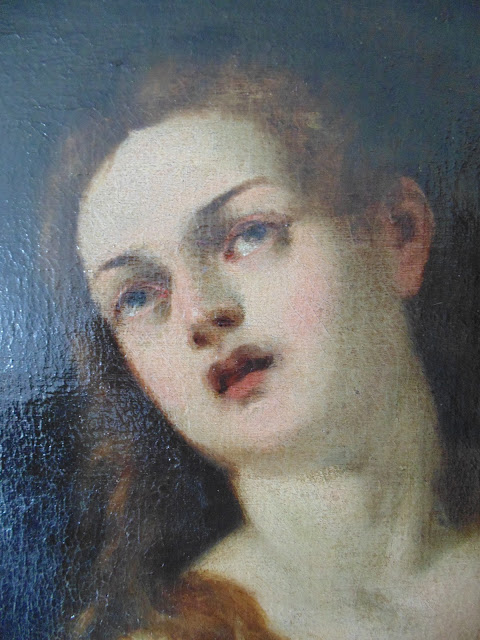
| Detail of face before and after cleaning. |
The canvas had an old relining, perhaps from the 19th or 20th century and this had clearly helped to preserve the integrity of the paint surface and indicated to me that this was older than the 19th century as it is unlikely that it would have been necessary to reline a canvas so soon after it was created if it was mid or late 19th century. It also indicated that whoever had it relined considered it worth the effort and expense so it must have been valued by the owner. My feeling was that it had all the physical and stylistic hallmarks of a late 17th century baroque painting following very much in the tradition of Titian's earlier models.
The first stage in the cleaning was to remove the surface dirt with a cotton wool swab and synthetic saliva. This was an exciting stage as it revealed quiet dramatically the extent of the yellow brown dirt and gave a glimpse of the real colour underneath the varnish layer.
 |
| Cleaning surface dirt with synthetic saliva |
Whilst the cleaning of surface dirt with synthetic saliva made an initial dramatic difference to the colour and tonal balance of the painting the photograph below reveals the full extent to which the removal of the yellowed varnish layer afterwards made towards revealing the real quality of paint surface below. Through the careful use of a specially formulated wax emulsion, with the addition of of small amounts of appropriate solvents to create a safe cleaning agent which could afterwards be cleaned off with white spirit, it was possible to proceed without causing any damage the paint surface.
 |
| Cleaning old yellowed varnish with carefully tested wax emulsion mixed with appropriate solvent. |
The difference between the fully cleaned surface and the uncleaned surface can be seen clearly in the detail below of the sleeve and arm. In some areas it was necessary to use a very fine metal tool to carefully scrape away tiny spots of dirt that could not be removed with wax emulsion and solvents. A certain amount of residual varnish or dirt remained but not enough to disturb the eye at a few paces. I preferred to under-clean rather than over-clean as anything that is cleaned off cannot be put back afterwards and the purpose of the restoration was not to damage the paint surface in any way.
 |
|

The sleeve during cleaning and after cleaning testing the protective coat of mastic of Chios varnish.
After cleaning it was necessary to consolidate the loose and frayed edges of both the canvas lining and the original where they were tacked to the wooden stretcher frame. This was done by using a specially formulated welding powder designed for the purpose.


Once the painting was cleaned and the edges consolidated I had to give the whole surface a protective layer of mastic of Chios varnish. The effect of varnish both protects the original paint surface from superficial retouching in varnish paint, which can be easily reversed, and saturates the tones and colour giving both richness and depth, and unifying the whole painting. This was one of the most dramatic and satisfying moments of the whole process revealing the rich warm palette of colours. The theatrical lighting effects became more pronounced, both in the dramatic tonal contrasts, and helped to emphasize the solid sculptural forms and spaces, and in other areas the more subtle closer tonal contrasts in the highlights and shadows became more apparent.

The last stage involved using a special gesso filler to plug any tiny holes and then first with tempera paint, and then mastic varnish and restoration paints, to match the colour and tone to the surrounding area with tiny pin pricks of the brush point in those few areas of slight paint loss that needed retouching. (filler in the upper centre and right, and lower left, right and centre of the canvas.)
 |
| canvas with holes plugged with filler |
The left hand image shows the face before retouching with specks and marks of paint loss or tiny damages still visible and the right hand image shows the face after retouching. Below a close up of the finished face and the painting awaiting its final coat of synthetic varnish.
After this final varnish I will search for an Italian frame in the correct style for the period, like the example below, from the Detroit Institute of Arts. This typically Baroque 17th century Tuscan reverse cassetta frame places the highest point of the profile next to the picture rather than at the outer edge of the frame, and has a frieze decorated with gilded arabesques and stars. The framing department at Schleiper in Brussels manufacture similar frames in reproduction.That will have to be after the lock-down is lifted and the framing department reopens, but in the meantime I have used Abobe Photoshop to simulate the final effect.


No comments:
Post a Comment